> For the complete documentation index, see [llms.txt](https://mobsted-2.gitbook.io/knowledge-base/llms.txt). Markdown versions of documentation pages are available by appending `.md` to page URLs; this page is available as [Markdown](https://mobsted-2.gitbook.io/knowledge-base/basics/introduction/use_automatic_data_filters.md).
# Showing Data in app - Filters
You can filter any app user data or actions they perform within your app. Once **Filter** is created it is updated automatically every 10 minutes OR as soon as the data pull request was sent.
Filters output the following data:
* Aggregated data (record count, max, min value)
* List of records which fall under Filter condition.
{% hint style="info" %}
**Each filter can be applied to events and users** (objects) - both at the same time. For example: we have a clickable button and we have a filter which tracks those button clicks. And we have two app users, each clicked the button twice. In the Objects section, this filter will show the count of **two** (two app users clicked the button). In the Events section, this filter will show the count of **four** (total number of button click events is four).
{% endhint %}
\_\_\_\_\_\_\_\_\_\_\_\_\_\_\_\_\_\_\_\_\_\_\_\_\_\_\_\_\_
#### CREATE YOUR FIRST FILTER
1. Open **Demo App**
2. Create new screen by clicking **Add Screen** at the bottom of the screen
3. Go to **Objects** in the top menu

4\. Click **Add Filter** and then **Create Filter**
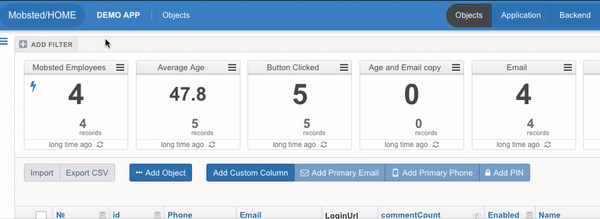
5\. Name the filter as *AgeEmail*
6\. In **Conditions** section select **Email** as the searchable field from the first drop down
7\. Select **Contains** and enter *gmail*, click on highlighted option when done
8\. Click **Save Changes** at the bottom of the screen.
\_\_\_\_\_\_\_\_\_\_\_\_\_\_\_\_\_\_\_\_\_\_\_\_\_\_\_\_\_\_\_\_\_\_\_\_\_\_\_\_\_\_\_
#### DISPLAY FILTER RESULTS ON APP SCREEN
Now modify the logic of the created filter to show how many gmail users are less than specific age entered into another field.
1. Go to **Constructor** - click **Application** on the top and then **Constructor**
2. Drag and drop [**Text Input**](/knowledge-base/references/intro-placeholder/constructor_elements.md#text-input-and-text-area) element to the screen emulator
3. Set **Text Input** properties:
* **Backendname** as *Age*
* **Default Value** as *#Variable:ageVar#*

4\. Drag and drop **Button** element
5\. Set **Caption Button** property to *Check Age #Backendname:Age#*

6\. Click **Actions,** open **Add new action** drop down, select **Set Variable**
7\. Set **Variable** properties:
* **Name** as *ageVar*
* **Value** as *#Backendname:Age#*
8\. Click **Save**
9\. Click **Save Screen**
10\. Go to **Objects** section, click on your **AgeEmail** filter and choose **Edit** in the pop up menu
11\. Click **Plus** sign to add another condition - keep the logical condition to be **AND**
12\. In the first dropdown select **Age** column, change column type to numeric
13\. Set the comparison condition to be less than *#Variable:ageVar#*
14\. Click **Save changes**

15\. Go back to **Constructor** and add **Text** element to the screen emulator (this element will show the result of filter count)
16\. Fill in **Text** properties with - *Number people with age below* ***#Variable:age#**:* ***#ObjectsFilter:AgeEmail:Count#***
17\. Click **Save Screen.**
\_\_\_\_\_\_\_\_\_\_\_\_\_\_\_\_\_\_\_\_
#### CHECK YOUR WORK
Click **Preview** to launch the app from the current screen to check it works.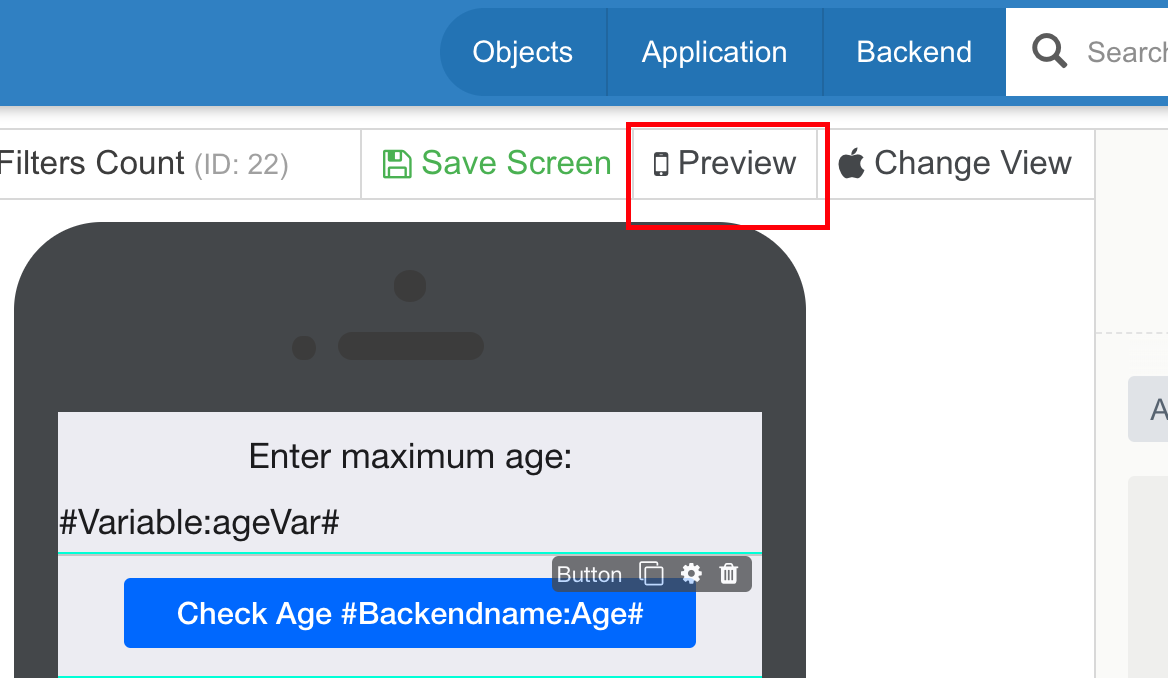
We use [Hashtags](/knowledge-base/references/intro-placeholder/hashtags.md) functionality to reference Objects filter **AgeEmail** and call it's count - the number of records which fall under filter condition.
**#ObjectsFilter:AgeEmail:Count#**
{% hint style="info" %}
**Note:** You can also check how it was set up in **Demo App** in your acсount, screen - **8 Filters Count**.
{% endhint %}
####
#### MENTIONED ARTICLES
* [Constructor elements](/knowledge-base/references/intro-placeholder/constructor_elements.md)
* [Hashtags](/knowledge-base/references/intro-placeholder/hashtags.md)
* [Automate with triggers](/knowledge-base/basics/introduction/automate_with_triggers.md)
* [Apply loops to screen elements](/knowledge-base/basics/introduction/apply_loops_to_screen_elements.md)
#### RECOMMENDED ARTICLES
* [Smart filters](/knowledge-base/references/intro-placeholder/untitled-1.md)