📈
Knowledge base
  • Getting started (placeholder)
  • Basics
    • Intro (placeholder)
      • "Hello world of PWA!" app
      • Testing the App
      • How to hide / show screen elements
      • Create user actions: switch screens, change data and make API calls
      • Screens
      • Show any platform Data in app ellements
      • Showing Data in app - Filters
      • Loops - display multiple line results in app
      • Automating Business Processes & Funnels via Triggers
      • Send and Receive data via external API integrations
      • Chaining API calls
      • Use MathJS formulas
  • PWAbility
    • PWAbility
      • App distribution
      • Saving Mobsted PWA App
      • Smart Messaging
      • Guaranteed delivery
      • Offline Mode
  • Messengers
    • Intro (placeholder)
      • Set up VK bot
      • Set up Facebook bot
      • Set up Telegram Bot
      • Set up Viber bot
  • Data
    • Import data (placeholder)
    • Export data (placeholder)
  • References
    • Intro(placeholder)
      • Constructor elements to build your app
      • Filter any backend and Object data
      • Manage app users and objects
      • Events
      • Statuses
      • Hashtags
      • Variables
      • Lists (placeholder)
      • User Access
      • API Description (placeholder)
Powered by GitBook
On this page

Was this helpful?

  1. Basics
  2. Intro (placeholder)

Show any platform Data in app ellements

Display any user & backend data

PreviousScreensNextShowing Data in app - Filters

Last updated 5 years ago

Was this helpful?

Reference any data stored within the platform and display it tо app user or use the data in screen logic. The same approach on our platform allows to address and pull data from any fields, like , , and more complex data entities, like and .

______________________________________

ADDING AND DISPLAYING USER DATA

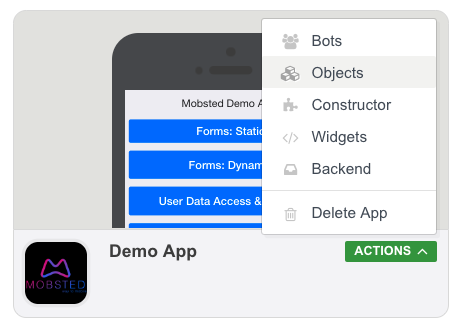
  1. Navigate to your "Hello world of PWA!" app or create a new app and go to Objects section. To go to Objects section you can use the steps below:

    • If you already entered your app: header → left-hand side menu → Objects

    • If you just logged in and see apps list: ACTIONS → Objects
2. Click Add Custom Column, name it as Name and click Save Column
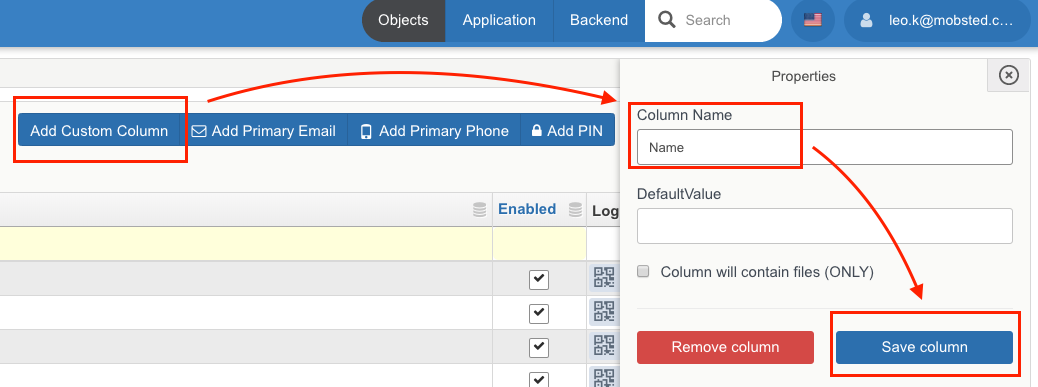
3. Add Email and Phone columns by clicking Add Primary Email and Add Primary Phone buttons

4. Fill in the added columns with Name, Email and Phone number

5. Navigate to Constructor by clicking Application button in the header

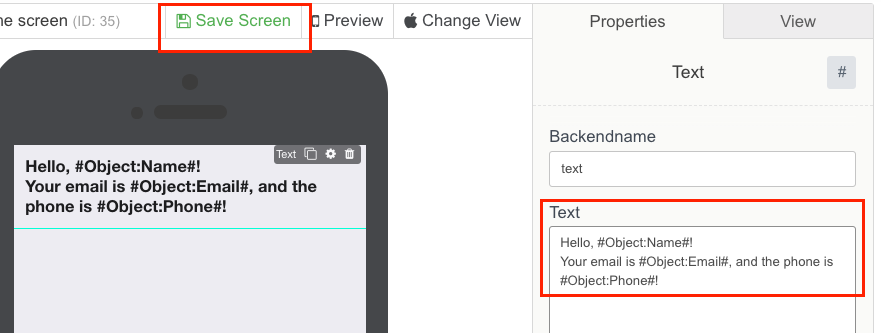
7. In Text element properties fill in: Hello, #Object:Name#! Your email is #Object:Email#, and the phone is #Object:Phone#!

8. Click Save Screen
10. Navigate back to Objects section, go to LoginURL column, click Open App link. You will see the personalized app up and running.

MENTIONED ARTICLES

6. Drag and Drop element

We use to reference the data in Object columns. The same functionality is used for any other data source, such as Variables, Element Names, Filters, arrays from API calls, etc. Refer to article for more info.

Text
Hashtags
Hashtag
Objects
Variables
Hashtags
Constructor elements
Objects
Variables
Filters
API Operations